Imagine you’ve just built the most gorgeous Gunpla of your life. The panel-lining is perfectly straight, the decals are precision-placed, and the plastic is blemish-free. However, your work isn’t over yet. If you want everyone to truly appreciate your Gunpla’s perfection, you’re going to need to take a photo that does it justice.
There are a lot of tutorials on the Internet about taking gorgeous, artful photography. But if you’re familiar with our philosophy here at Gunpla 101, you probably guessed we don’t think you need to be a pro photographer to take a decent, non-blurry photo of your Gunpla.
Here’s how to practice model photography, the Gunpla 101 way.
1. Use an actual camera.
We take most of our photos with my 10-megapixel Nikon P7000. On the other hand, we took the photo above with John’s 16-megapixel Samsung Galaxy 4. Why do the photos taken with a real camera look better, despite it being four years older and having fewer megapixels? It’s all about that lens. A real camera will have an option to allow you to take macro, or close-up shots, which is essential when you’re photographing small figures.
I also highly recommend using a tripod for stability. Macro photography especially benefits from a stable shot, since any shake of your hand will be magnified in a close-up. My Benro Aluminum Tripod is very lightweight (because of the aluminum) so I don’t think twice about carrying it around, despite being a small woman.
2. Wait for the right lighting.
All the photos you see on Gunpla 101 have been taken between 10 AM and noon, which happens to be when our apartment gets the best light. In fact, the photo you can see me taking above looked so nice in the natural light, I hardly had to touch it up at all:
Professional product photographers use a lightbox to ensure the proper lighting. If you don’t want to be limited to taking photos during the hours you get natural light, you can buy one or make your own.
3. Find a flat surface and distraction-free background.
Since we don’t use any fancy photography tools, anyone reading Gunpla 101 for long enough has a pretty good idea of what our living room looks like—but only when our living room is spotlessly clean. If you don’t have a photo backdrop, at least make sure there’s nothing distracting in the background of your photos like clutter, or faces reflected in mirrors or electronic surfaces.
We take most of our photos on our kotatsu table, which looks like this from a human perspective:
And from there we use creative angles to ensure the Gunpla is the focus of the shot.
4. Dust off your model kit.
Another thing about macro photography: it shows everything. So if your Gunpla isn’t dusted, or even just not 100% dusted, it’ll show up. Check out our Gunpla cleaning tutorial for ensuring your Gunpla are ready for their close-ups. Even so, I need to work on this. I didn’t realize there was still some dust on Gundam Musha until I saw the final photo!
5. Frame the shot.
The position and placement of your Gunpla really do matter to the shot. We’re no experts, but you can read plenty of professionals’ tutorials about photo composition. What we do know: make your Gunpla the focal point. That means saying yes to dynamic poses, saying no to shooting from too far away where viewers can’t see the details, and under no circumstances should the photo be blurry.
After you’ve arranged a composition you’re happy with, take a bunch of photos. I usually take at least 10 in a session to make sure that I end up with at least one that I like.
6. Photoshop.
Load the photos into your computer and pick the ones you like best. These are the ones you’ll want to port into Photoshop or its free sibling software, Gimp. My instructions are for Photoshop, but Gimp has pretty similar settings.
First, select Image from the menu and select Auto Tone, Auto Contrast, and Auto Color in any order. I’m not an expert, so I let Photoshop do the fine-tuning for me.
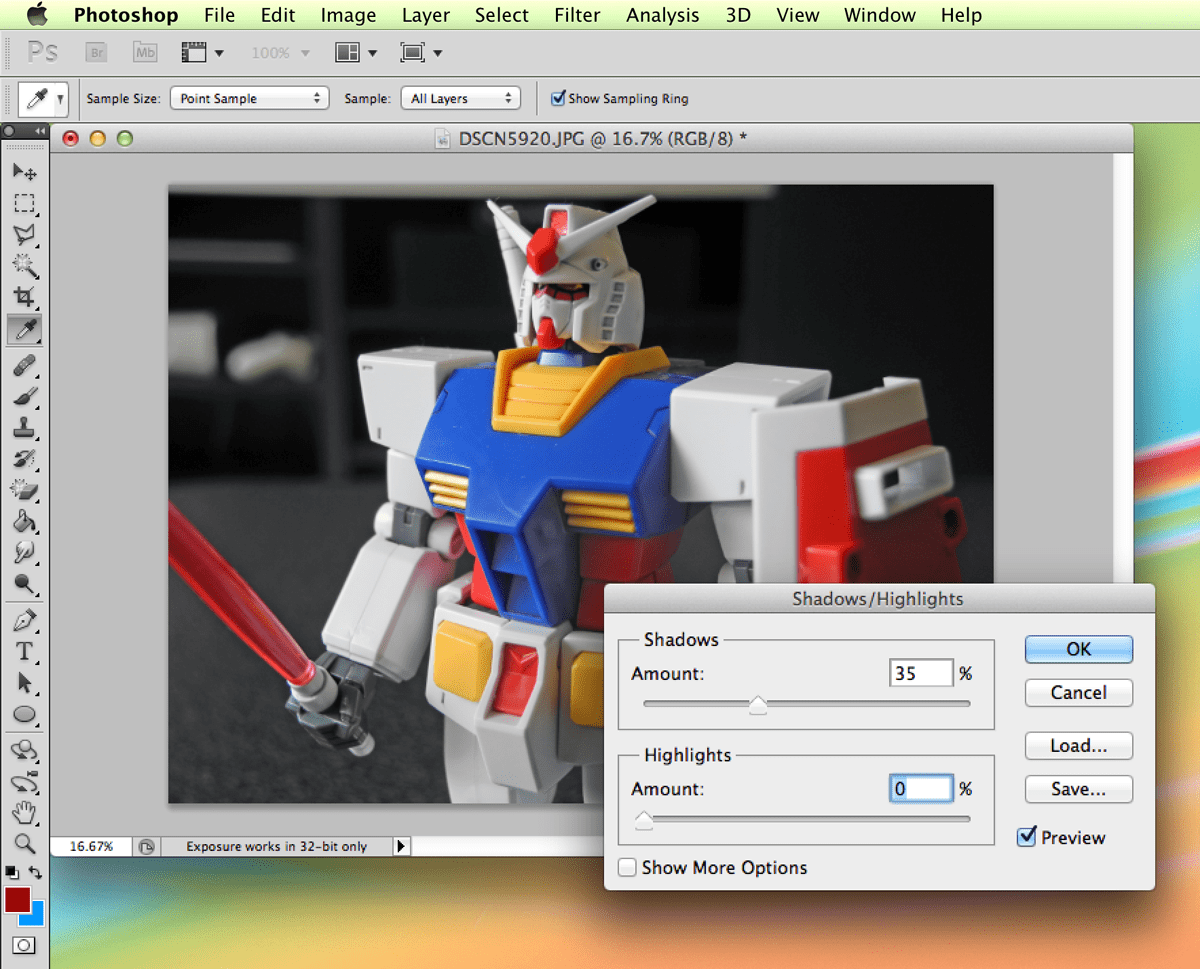
Next, go to Image > Adjustments > Shadows/Highlights. If the photo seems too bright, tweak Shadows. If the photo seems too dark, like the example here, tweak Highlights.
Here’s the before and after. It’s not a huge difference, but lightening up the image makes the contrast more natural and present a more accurate presentation of the Gunpla’s colors and shape.
As usual, I’m not advocating this as the One True Correct way to take Gunpla photos, and certainly not the only way! But if you like how the photos look on Gunpla 101, this is how we make them happen.


22 Comments.
You forgot the most important thing about gunpla photography. Posing. You have to pose your gunpla otherwise it will just look like a toy.
@disqus_G7Mtd1Tvah:disqus I mentioned it in step 5, but you’re absolutely right. Poses matter!
Oh there it is. You should do a tutorial on posing your gunpla. I think it’s just as important as lighting.
…………terrible posture. Look s like a cheap toy.
I’m terrible at taking photos I just use my mom’s iPhone. xD
@superpizzagundamman:disqus we’re not trying to pick on people who do that. But if you’re ever looking for suggestions on how to make your Gunpla photography pop, here are some ideas!
Here’s the MG RX-0 Unicorn Gundam (OVA Version) docked inside the MS Cage (from the HD Version). Bought a battery-powered miniature spotlight intended for a Christmas village, placed it on the front side of the cage, brought out the iPod fifth generation and took this image.. https://uploads.disquscdn.com/images/3be0df55733c76e60079267cf5c0c2452f5cd439b52c11e67f813098cdc34c70.jpg
do you have a link to said spotlight? was looking to do something like that of my own.
A small Gunpla humor… My RG RX78GP01fb Gundam Zephyranthes Full Vernier is getting a “little” impatient.. https://uploads.disquscdn.com/images/0d478f61ce518ed09b22813c49f01b38fd275dc683a0a08bdb16ae0752fe4034.jpg
Hi Lauren & John. Here’s my nearly-completed Real Grade RX-78GP01FB Gundam Zephyranthes Full Vernier. I still have to work on the beam rifle, shield and painting the small figure of Kou Uraki. I also created my own GP Base Info card similar to the one that was shown on the Gunpla Build Fighter anime..
Hello Lauren and John. Finally, I’ve completed my RG RX-78GP01Fb after almost two months working with it. It was more challenging compared to my past Gunpla builds but I had fun and enjoyed every moment building the Full Vernier. Here it is..
@MacTan10:disqus it’s fitting you left this comment on the photography page, since it’s a great photo with low-depth of field. I can really appreciate all those tiny stickers!
Hi, Lauren. I personally prefer the water-slide decals over the kit-supplied sticker ones. I sometimes encounter issues with some of the stickers especially at this scale where the sticker refuses to completely adhere to the plastic surface even after painting the part where the decals to be applied on. For the water-slide types, I use a decal-setting solution like micro-sol and it works even for complex surfaces with smaller surface area. The problem? Bandai releases the water-slide decals (Gundam Decals) on some of the real-grade for a limited time only. In fact, the GD-96 decal is currently unavailable even from the well-known online retailers like Hobbylink Japan, Amazon and Hobby Search. My RG Full Vernier would’ve looked much better with the water-slide decals, in my opinion.
I’m also considering on buying a lighted photo box as well for future gunpla photo shoot. If not, maybe I’ll make a DIY box instead.
Close-up view of my MG RX-0 Gundam Unicorn using my Nikon D3200 DSLR with a 40mm macro lens attached. Although this is the OVA version of the Gunpla kit, it almost looks like a Ver. Ka due to the GD-44 waterslide decals I used. For the slight weathering effects, I used the shading on a piece of paper from a Staedtler 5B Mars Lumograph pencil and applied it on the Gunpla’s surface using a piece of Q-tip. Applied a Testor’s Clear Lacquer Overcoat on its surface afterwards.
My current WIP, 1/144 HG-IBO Gundam Barbatos (First Form) inside the DIY Photo Lightbox. Applied some glowing eye Photoshop effects on the Barbatos. I still have to work on the weapons as well as the backpack.
Recreated the battle scene between the Gundam Barbatos and Gusion in Iron-Blooded Orphans Episode 13 when the Barbatos impaled the Gusion with the katana with just one minor discrepancy: the Gundam Barbatos gunpla used in the scene is the First Form not the Fourth Form as seen in the anime.
[…] Gundams are weapons of war so it adds realism to your model kit to give it some battle damage * staging – This is a way of exhibiting your Gundam in a way that shows of its most spectacular […]
nice clarity of the pictures bro, however, your posing sucks. just being honest. now here’s an example of clarity with some realism in posing. https://uploads.disquscdn.com/images/9edd73f124c8b725082f841ebfbab1a148a5787c80694921adb1f25fd4ecfe13.jpg
I’ll leave this comment up but remember for the future that Gunpla 101 is a positive environment. Let’s support each other’s efforts from now on. Constructive criticism is OK, but this is not constructive.
Sure, your Gunpla looks good but your attitude sucks. And you call yourself a modeler? Just being honest too,,
Honestly, I’ve seen much greater looking Gunplas than yours and the builders are not bragging about it. True pro Gunpla modelers let their works speak for itself and do not belittle other people’s works. You need to learn a little lesson in humility sometimes.
Although my GM Gunslinger Custom is still in a WIP status, I just love the Gunpla Mafia’s GM body articulation when it comes to posing the Gunslinger. Here’s one mimicking Timothy Dalton’s James Bond 007 stance from the 1987 flick, “The Living Daylights”.
Definitely not a problem at all.. https://uploads.disquscdn.com/images/fd7b83331de7ac4c6cc5391207a64460a3edeec8b3b1ca7ae7404e073aec21ed.jpg